
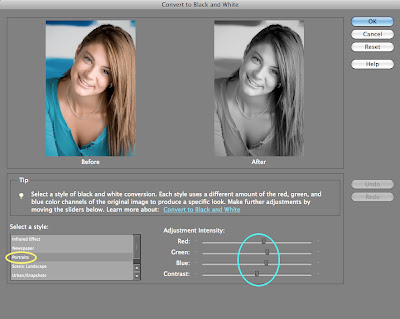
Photoshop Elements is a very powerful younger sibling to the full version of Photoshop. Many would make the statement that with Lightroom, the full version of Photoshop may not be necessary for even the professional photographer. So if Elements is a somewhat lobotomized version of Photoshop what can we do to find a work around to produce the same effect. A case in point is the black and white conversion. In Photoshop the channel mixer that can provide brightness differences in a color image converted to black and white. This is also available in camera raw and Lightroom color panels. Simplified in Elements though is the Convert to Black and White options panel. In the screen capture below is an example. There are preset options indicated by the yellow oval and then RGB and contrast sliders indicated by the cyan oval.
This is certainly better that simply desaturating the image. This post will deal with how to identify individual RGB colors allowing you a greater flexibility in your creativity. Referring to the layers panel below you must first create three Hue/Saturation adjustment layers on top of your main image. Then Option (Alt for PC) click on the line between the layers to apply the adjustment to the attached image only (layers 4-6). Rename these Red, Green , and Blue.

Next you want to double click on one of the adjustment layer icons to reopen the adjustment panel (see screen capture below). Under the Edit menu select the color represented by the layer you are working on (in this case Reds). If you have never been into this level, you will soon learn what those colored bars mean at the bottom of this panel.

Training Sidebar: There are four adjustment points between the two colored bars on the Hue/Saturation panel. The inner two points (one circled in cyan) defines the edge of the color range the adjustment is going to effect. The outer two (one circled in yellow) define the blending range of the effect. You can see in the image above, these points are together and there is no blending while the image below shows a blend gradation.

The object is to define three ranges (red, green, and blue) on separate layers by adjusting these sliders. In the Blue layer select the Edit for Blues and adjust the points to the left third of the color scale. Then in on the Green layer edit the Greens and adjust the points to the right third of the color scale.
While you are setting these points you can set the Saturation to -100. Adjust the Lightness slider for effect. If you have to go back to the adjustment layer it defaults to Master. You will need to reedit the specific color. When you get to that specific panel, you prior adjustments will be there.
Finally you can create a layer on top of the others (layer 7 in the screen capture) and fill it with 50% gray and set the blending to Overlay. You can paint with low opacity (2-15%) black and white brushes to non-destructively dodge and burn. If you get to carried away (easy to do) simply paint with 50% gray at 100% opacity and you are back to square one. On the image below this effect was applied to all three images to show just the black and white process.

The first image is a nice color photo, the center is a nice B&W conversion accepting the defaults of the Portrait setting of the Convert to Black and White options in Elements. Finally the right image is the black and white conversion described above. With a little work your image can have that extra something that keeps the viewer glued but does not know why.
Thats it for this week. Have a great weekend.
Cya... Doug


No comments:
Post a Comment